
Why would a photographer need to shoot in manual?
Well…because automatic limits you. Most cameras are set up so that the automatic function just makes sure that it “gets the shot”. The camera doesn’t care if the shot looks great, just as long as there is enough light to make the exposure. Point-and-shoot cameras are the worst at it… They can:
1) Add a ton of flash, washing out the subject and ruining the shot.
2) Up the ISO trying to get light, while ruining the shot with unintended grain/noise.
3) Use a wide open aperture when the photographer doesn’t really want that shallow of a depth of field to begin with.
Sounds terrible, right? Right. Stop using automatic.
How do we fix this problem? First, you will need to buy a Digital SLR. A decent one goes for around $500. The Canon Rebels are great. If you want to go pro…it might still be a good idea to get the Rebel rather than a Canon 5D mark iii ($3500). You need to make sure you really will be able to shoot in manual so that you aren’t limiting the camera’s capabilities. Don’t buy a 5D mark iii and shoot it in automatic! That is one of my biggest pet peeves..
Okay…this may take some practice so please do not get discouraged. I suggest starting off with a function known as Aperture Priority on your camera, pictured as AV. Usually it is found on the top of the camera in that little wheel (the one with the automatic and manual options on it). I am a Canon girl, but I will do my best to teach to the Nikon people out there as well. For Nikon owners, this function is known simply as A. What this option means is that your camera will allow you to set the aperture and ISO while it sets the shutter-speed for you. It makes the process a bit easier. Pictured here: Canon on the left, Nikon on the right.

Take your Digital SLR, find the AV or A(Nikon) setting on the camera and switch to it. OMG! YOU’RE NOT IN AUTOMATIC! Don’t worry….you’ll have plenty of time to freak out later. Now, look at the back of your camera or the top depending where the screen is. If it isn’t lit up, some cameras require that you push a button first. Please refer to your manual…I really don’t want to explain this for every camera model out there. There should be a couple of things on this screen (if there isn’t anything, push your shutter halfway down while still looking at the screen and the information will pop up):
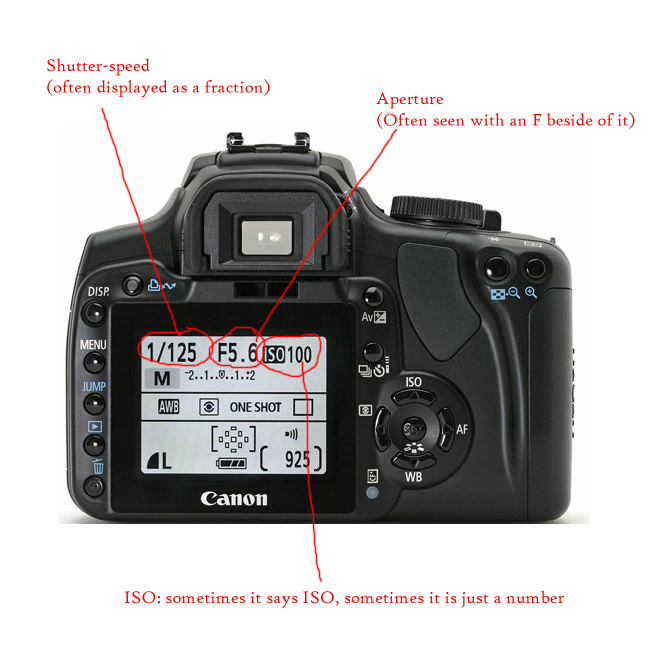
ISO
ISO is your camera sensor’s sensitivity to light. Back in the film days, cameras required that you get different film for each ISO and it had to stay constant the entire time you were shooting. Thankfully, digital doesn’t force you to think that way.
ISO does two things. First, it allows the camera to get more light. Secondly, it allows grain to show up in the camera.

Notice how at ISO 100, the image is smooth. At 3200 the pixels look damaged and grainy. This is called “noise”.
Aperture
Aperture, like ISO, controls two things. It controls the depth of field and the amount of light entering the lens. Depth of field refers to how much of the subject is in focus. A shallow depth of field leaves some of the subject out of focus, while a larger depth of field means that the foreground and background are both in focus. The camera’s aperture is the hole or opening in the lens that allows light through. This hole can get bigger or smaller depending on the camera’s settings. The sizes of the opening are known as f-stops, hence the “F”. F-stops average from f/2.8, f/4.0, f/5.6, f/8.0, f/11, f/22. The higher quality lenses will allow your aperture to open up to f/1.2, f/1.4, or f/1.8. These are known as “L” series lenses. They are expensive!

Depth of field is shown here:
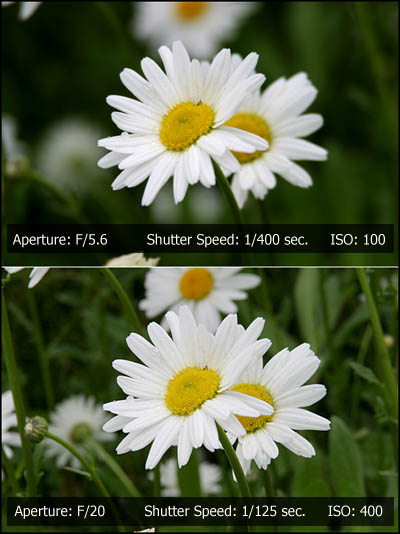
Here, please just pay attention to the f-stop settings.
Shutter-Speed
Shutter-speed refers to how quickly the shutter is moving inside of the camera to take the photo. Faster shutter-speeds will freeze the subject in action, while lower ones can be used to create motion blur. Typically, when hand-holding your camera during a shoot you won’t want to go below 1/60. If you do, because of your body’s natural “shaking” you won’t be able to get a sharp image. Some professionals can shoot as low as 1/15 accurately.

Now…this is where it gets tough. In order to shoot in manual you must be able to balance all three while still maintaining a correct exposure….in a matter of like..one second. For now, just practice with still objects rather than people so that you don’t miss any important shots! Since we are using Aperture priotity (AV), you only need to focus on the first two. Set your ISO, set your aperture, and begin shooting. What do you need to adjust to get more light? Less light? A larger or smaller depth of field? Less noise in the photo? Practice makes perfect!
If you are outside, I would suggest using an ISO of 100 or 200. If you want a blurred background, use a smaller f-stop (2.8 or so). Begin to play around a bit. You won’t learn this in a matter of a few hours. It takes a LOT of trial and error.
Think you are ready to shoot in full manual?
You are a brave soul. Switch to the “M” on your camera’s dial. Nikon should be the same. Set your ISO first. Are you inside? Outside? How much light will you really be needing? I’ve provided an example below from one of my most recent sessions. My ISO here was set at 50. I think only the higher end cameras go down to 50. That’s okay. Just use 100 for now for bright days. The reason that I chose to set my ISO at 50 was because I knew that at ISO 50 I would be able to use a fast enough shutter speed and a small enough aperture while still having enough light coming into the lens. Then, focus on your depth of field choice. Are you shooting portraits? I suggest a small depth of field. For this image, I used f/2.0 to blur the background. That’s letting in a LOT of light. But its okay because our ISO is barely letting in anything right now. Lastly, I set my shutter-speed at 1/800. The day was so bright! because the shutter wasn’t open for very long at all (1/800 of a second!) I knew that almost NO light would be coming in. There wasn’t much of a chance to light to get it with such a fast shutter-speed. BUT…my aperture was opened up enough that light was able to come in.

Hope this helps! Practice with it a bit. Comment below with links to your own images maybe? Last but not least…please have fun. I know its frustrating. Don’t worry…its worth it.

Pingback: 10 new list post ideas | Photo Biz Blog
Pingback: White balance: what is it? How do you use it? | Photo Biz Blog